Tuesday, April 30, 2013

Filling Seams and Holes

I'm getting impatient but trying to stay focused on the prize.  The next step is tedious but so important to get it right.  I sought out advice from the source of the original inspiration of the room, Linda, from Calling It Home on how to do the finishing work.

Using DAP Crack Shot and Dry Dex I applied a thin coat, sanded using a sandpaper sponge and then repeated.  I kept repeating her advice that if you can feel the seam you will see it.  Pay careful attention to any raw MDF edges.  They also need a thin coat of mud.  We did our best to design the trim placement so that there was as little as possible but was impossible to avoid everywhere.  Raw MDF soaks up primer and leaves an ugly, bumpy finish so apply a thin coat and sand lightly to smooth.


This is what my office looks like.  I have to put on my climbing shoes to get to my computer.  I am so anxious to get my house put back together!


Monday, April 29, 2013

Still At It

I'm about to add MDF as a food group.  At least it has felt that way this past week.  I'm pretty sure I ingested a few tablespoons of MDF dust and I'm still seeing MDF boogers when I blow my nose.

Each night this week we cut MDF strips down to size and primed.  In the driveway.  At 9 PM.  In the dark.  Not a technique I'd recommend but it allowed us to get the legwork done and contain the mess outside so that come last Saturday we could start getting sheets on the walls.

The grandparents came into town for the weekend to help us.  If there was ever any question over who my biological parents were the fact that they're happy to drive 300 miles to spend the weekend working on our house clears it up.  Seriously the most generous people with their time, gifts and talent that I've ever known.

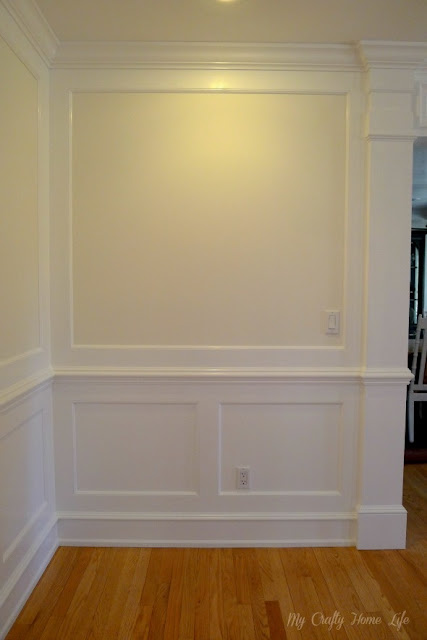
After two 12 hour days we finally have all the MDF 'base layers' up on the wall.  The below picture will give you an idea of what the finished product will look like once all the finishing trim is added.  I'm hoping that step is neater/faster.  I love the interest the fake columns gives the entrance.


To install the MDF base layers you see below we used a combination of liquid nails on each board, finished nails/brads and biscuits/glue to connect each stile to each rail because almost none of the stiles landed on a stud (figures).  Hopefully that will prevent anything from moving over the long term.


Next up is to apply all the finishing trim and fill the nail holes and seams.

Today is our 7th wedding anniversary.  What gift is 7 years?  MDF I hope.

Wednesday, April 24, 2013

Where we're currently at...

The basic feel of the room hasn't changed but some some of the pieces have.  This is what we currently have for the room.  Now if only the construction would end so that everything wouldn't be sitting in my dining room...

The grandparents are coming into town on Saturday to give us a couple extra hands to help get this sucker done!

Living Room #2

Wednesday, April 17, 2013

Chairs


Dear overstock.com, you had me at free shipping and 15% discount.
Ikat.
Need I say more?
   

Monday, April 15, 2013

...and then, oops, this happened...


A nail every inch in a room 22' x 16' means I pryed out about a bajillion nails yesterday.  I'll be back with more details after my hands unfreeze from the claw position.

Sunday, April 14, 2013

Let There be Light!

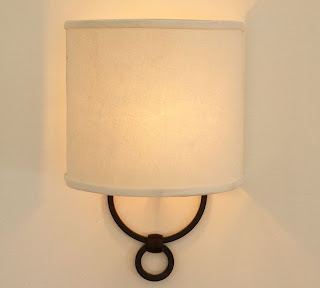
The lights are here!  As long as we were going to be covering 1/2 our walls with wood trim we thought it would be a good time to install sconces.  It wouldn't matter how great the new trim looked if we couldn't see it.  It was a fairly easy project.  4 hours and $300 in lights and materials and our dark living room finally has light!  Hanging them in the corners really draws the eye out and makes the room look larger.  We're really happy with the results.


Why is the room empty you ask?  An empty room can only mean one thing...

Friday, April 12, 2013

Lighting

So #1 on my living room shape up to-do list was to improve upon the lighting. 
 
The very first thing we think about when we begin a renovation process is the lighting design.  In most rooms we’ve started with recessed lights and then layered in pendants or sconces and table lamps.  Lighting is the living room’s biggest problem but because we’re not interested in turning our ceiling into Swiss Cheese accessing wires and because we don’t really want overhead lights in our living room we’ve decided to forego recessed cans and stick with sconces and table lamps.

We’ve just begun our wainscot project so if we’re Sean’s going to install sconces it needs to be done before the woodwork is done so we can cover the holes in the wall with the woodwork.  I went on the hunt for sconces with the below characteristics.  I’m like Katniss in the Hunger Games when it comes to internet shopping.
1.       A good source of light.  Sounds obvious but some lights are prettier than functional.

2.       A light that is fairly muted.  Because this would be a primary light source it would be on 
           most of the time so it had to be something easy on the eyes.

3.       Casual.  This room is definitely going to be more formal than our family room but still has to
           be livable and kid friendly.  The lights needed to help tone down the formality of the trim.
 
The Francis sconce at Pottery Barn met all 3 requirements and because we’ve installed them in our bedroom about a year ago Sean was familiar with the install and happy with the quality.  A known quantity. 
 

I applied my 15% off coupon and was able to get 4 sconces for $250.  Decent deal for 4 lights.  Because I bought it online through www.upromise.com I was also able to get $13 deposited into my kids 529 college savings account.  Thank you Pottery Barn for supporting my kids’ college educations!
The sconces were delivered yesterday so Sean will install them tomorrow.  Pictures to follow! 

Wednesday, April 10, 2013

Living Room #1


While we work on the architectural elements of the room I thought I'd take a break and daydream about some of my favorite living room designs and the look I'm hoping to achieve at the end of this.  These are some of my favorite things I've been eying for a while so if money were no object (but unfortunately it is) here is what I'd like the room to end up as.
Living Room #1


Landon Sofa
potterybarn.com


Crate & Barrel Twist Table
crateandbarrel.com


Bornova Side Table
ballarddesigns.com


Tuesday, April 9, 2013

DIY Wainscot

I stumbled across the blog post at "Calling It Home" and it lit a fire to tackle the woodwork (or lack there of) in our living room make-over.  The blog is amazing.

So if you remember the room currently looks like this:

Our goal is to make this...


...look like this...


...and this...


...look like this.


If that section of wall and door header turns out according to plan then we'll carry it throughout the rest of the room.  The first step was to take measurements, draw the plan on the wall and buy the materials. If you look closely you'll see what our wall specs are going to be.  For the most part we followed the specs at Calling It Home but made minor adjustments to meet the scale of our room size and 8' ceilings. Her post is amazing and has some of the most helpful and detailed specs of any site I've seen.  We're using MDF with a 3.5" reveal and chair rail topped with an L Cap.


Photo bombed by a 3 year old straight from hockey practice :)