Sunday, April 29, 2012

IKEA hack

I heart IKEA.  Always have.  There is a sort of cult following of IKEA that I totally need to join. I’m already mixing the Kool Aid to serve alongside IKEA Swedish meatballs and am considering changing my name to Grundtal. 

I recently came across Aubrey and Lindsay’s blog where Lindsay did an awesome IKEA hack inspired by Style At Home.  A quick Pinterest search brought up some awesome hack ideas.
Like this one:
Or this one:


The Paris Apartment
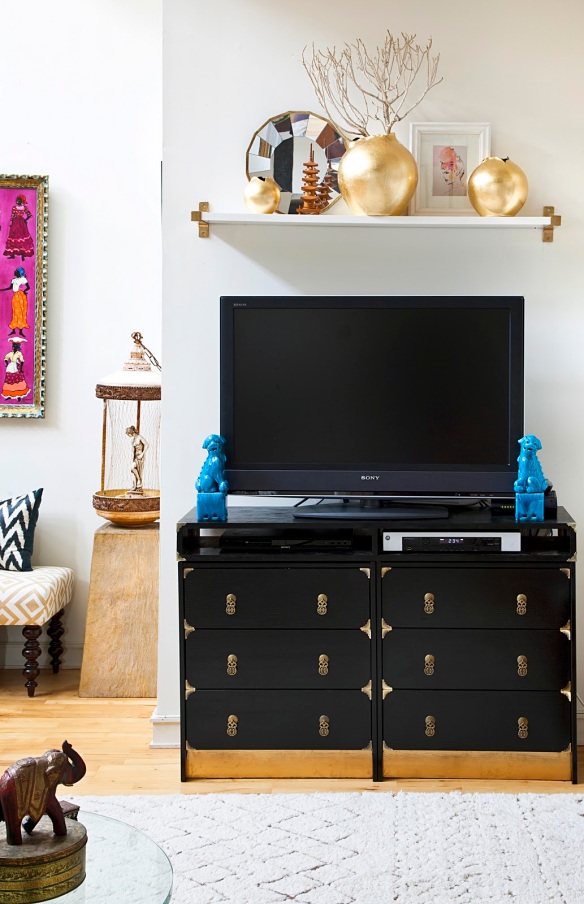
These dressers are pretty small but perfect as nightstands.  They’re solid wood and only $34.99!  Time for me to give it a shot and this was the look I tried to achieve.
Since my nightstands looked like this I didn’t have much to lose:
20120429-IMG_2026
From a distance it may not look bad but get up close and you’ll see it was Kai’s chew toy when he was a puppy (so yeah we’ve been living with these in this condition for almost 6 years).
Don’t judge me.
20120429-IMG_2031
I picked up 2 Rast Dressers from IKEA.  I’m pretty sure Rast translates to ‘awesome potential’ in English because while they may look like this out of the box, they’re actually solid wood and begging to be turned into something amazeballs:
RAST 3 drawer chest IKEA Solid wood, a hardwearing natural material.
First I had to assemble these bad boys. 
20120428-IMG_1969
Anyone who has assembled anything from IKEA knows why they include this picture in their directions:
20120428-IMG_1971
I used some leftover primer and trim paint from our bathroom renovation (which I promise I’ll show you as soon we figure out how to fix the awful permanent damage our glass contractor did in the room yesterday) and some leftover conditioner and stain from our DIY reclaimed wood console table project.  I primed (1 coat), painted (3 coats), conditioned (never skip this step), stained (2 coats) and poly’ed (3 coats, sanded in between) on these suckers.  I tossed the ugly knobs that came with the dresser and added some antique brass ring pulls. 
20120429-IMG_2032          20120429-IMG_2037
20120429-IMG_2035                     20120429-IMG_2040
It was that easy.  A solid wood nightstand for $34.99 + the cost of hardware!

Shared with: Between Naps On The Porch Beyond the Picket Fence
Image via

Monday, April 23, 2012

The Very Hungry Caterpillar Themed Birthday Party

My middle child, Brady, turned 2 last month which got me reminiscing about his 1st birthday party which was based on one of our favorite books, The Very Hungry Caterpillar by Eric Carle.

I made the invitations using green card stock and attached the circles with brads. Yeah it was a bit overzealous but hey at least I didn't have to make many!


I bought Chinese lanterns from Oriental Trading Company and grouped the green and red together and hung them from a curtain rod using dental floss to look like a caterpillar.

We served wraps for the adults and PB&J and Fluff 'n Nutters for the kids.


We served and labeled the food to go along with the story. 


My super talented sister, Melissa, made the cake.  Seriously isn't she amazing? 

 There was "Caterpillar Juice" for the little ones...

 ...and "Butterfly Juice" for the not so little ones!


Gift bags filled with butterfly and caterpillar treats and crafts.


And a sign to celebrate the man of the hour!


Shared @ Tip Junkie

Monday, April 16, 2012

Viva la Mexico!

1st vacation without the kids. I think I may throw up :) See you in a week!

Saturday, April 7, 2012

I'd Tell You a Joke About Mayonnaise but I Don't Want it to Spread

I made a pretty awesome discovery today (well I didn't actually discover it so much as I read it in This Old House).  Not awesome as in "I cured cancer" or "I figured out the tax code" (no I haven't filed my taxes yet, don't judge me) but more of a "well shoot isn't that neat" kinda discovery.  Mayonnaise removes water rings on wood furniture!

This is the 'before.'  It isn't a true before because I tried it once before I took any pictures.  It was full of water rings and very discolored.  There were 2 deep ones toward the front of the table that lingered after the first application:


I covered the water rings and let sit just long enough to put the baby down for a nap:

 Then I wiped the mayo off and used the remaining residue to wipe down the rest of the table.  Added benefit is that it revitalized the rest of the wood.  I then wiped the surface down with a wet rag to get rid of the mayo smell (not a good scent for a living room).

 Voila!  A revitalized, water ring-free table!


It turns out this crazy condiment also cleans crayon from walls (but not kitchen cabinets which I did try), fingerprints from stainless steel (success) and kills head lice.  I didn't have try this last one thankfully.  Little boys smelling of mayo is the last thing I need.

So anyway give it a shot on your own water rings!  Not curing cancer but pretty cool nonetheless!

Post shared at: Someday Crafts

Monday, April 2, 2012

Oops He Did It Again

One renovation always leads to another (because why do just one big reno project when you can do four?).  Demo'ing our master bathroom meant moving walls, heating elements, removing closets, etc. which left us with big gaps in our carpeted hallway.  Oh darn, we'd have to replace our gross carpet with the cherry hardwood we installed in our master bedroom last August.  Last weekend Sean worked tirelessly again (hence the Britney reference) by ripping up the carpet and the billion staples that held it in place.  I laid down rosin paper over the sub floor and 5" plank by 5" plank, he installed a shiny new floor.

Our master suite is a little tough to explain.  It was an addition that was originally 2 bedrooms (1 pink and 1 purple of course) with rotted windows leaking into our family room and topped off with an avocado green, laminate bathroom.  It has a separate staircase leading to it and is connected to the original 2nd floor of the house through a walk in closet connected to the baby's room.  It's weird and we're attempting to make it 'less weird' but 'less weird' will be as good as we can get it thanks to some structural issues.

A view from the top of the stairs into our current master bedroom. The boxes of hardwood are sitting in what is now our bathroom (we bumped the bathroom out a few feet) and that wall just to the left of the boxes was a closet we knocked out to make the bathroom and the hall at the top of the stairs larger.

Before:
During:
After:

A view from the hall into the old bathroom.  The door to the left was the closet/crawl space that isn't there anymore (that's where the new bathroom ends).

Before:

During:

After:

A view from the new master bedroom into the hallway at the top of the stairs.  The two openings are from when the space was two bedrooms.  It is all open now.  There were a lot of doors in that tiny space.  We removed seven doors.

Before:

After:


 A view from our new master bedroom into the hallway. You can see how narrow and dark that space at the top of the stairs was.  The door to the left is the door to the walk in closet that connects the addition to the original 2nd floor.

Before:

After:

A view looking up the stairs.  The wall at the top was pushed back a few feet to open up the space.

Before:

During:

After:


Now we can finally walk out of our bedroom and not have to wear shoes out of fear we're going to get a splinter or step in a stain of unknown origins.  That's always a fun day in the Martin house.