Saturday, June 15, 2013

Engineer Print


$3.79 project.  Did I have you at $3.79?
This is one of my favorite images of my boys because it showcases their personalities perfectly.  It was Easter so obviously my jokester Matthew was making bunny ears while the other 2 were yelling “AHHHHH” and "CHEEEEEESE" at the top of their lungs.  

You can get any image blown up to 24'x36” as an engineer print in black and white at Staples.  I logged into their website, uploaded the image, selected my local Staples location and the order was in.  10 minutes max.  
$3.79 later this is what I see each time I walk down our basement stairs:


Monday, June 10, 2013

DIY Towel Superhero Capes

My oldest is turning 5 soon.  FIVE.  How did that happen?  Like most little boys he's currently into all things superheroes and has requested a superhero birthday party.  Because his birthday is in July and because it is usually 100 degrees it will be a superhero pool party.

What is a superhero without his cape?  Just a newspaper reporter named Clark and last time I checked there is not a big demand for newspaper reporter birthday parties in the 5 year old circuit.  I searched for superhero towel capes but because they run upwards of $20 each I decided to try to DIY them.


Materials (I bought everything off Amazon):
-Towels - I bought a 24 pack of towels that look like they're marketed towards spas.  The smaller size is much better for 5 year olds and the real estate in my dryer. Or go the free route and use a towel you already have (affiliate).
-fabric paint (affiliate) and a cheap brush,
-freezer paper (affiliate)
-Iron on velcro strips (affiliate)
-Iron & ironing board
-An old rag, towel, t-shirt that you don't mind getting ruined


Steps:
  1. Wash and dry the towels to get rid of the loose lint
  2. Determine where you want the velcro strips.  The towels are as tall as my children so I folded the top under and then ironed on the strips so they don't trip on them.  Place a rag or old t-shirt you don't mind ruining between the iron and the towel to prevent any discoloration.  Be patient.  You must hold iron for the full 90 seconds.  60 will result in velcro that rips off.
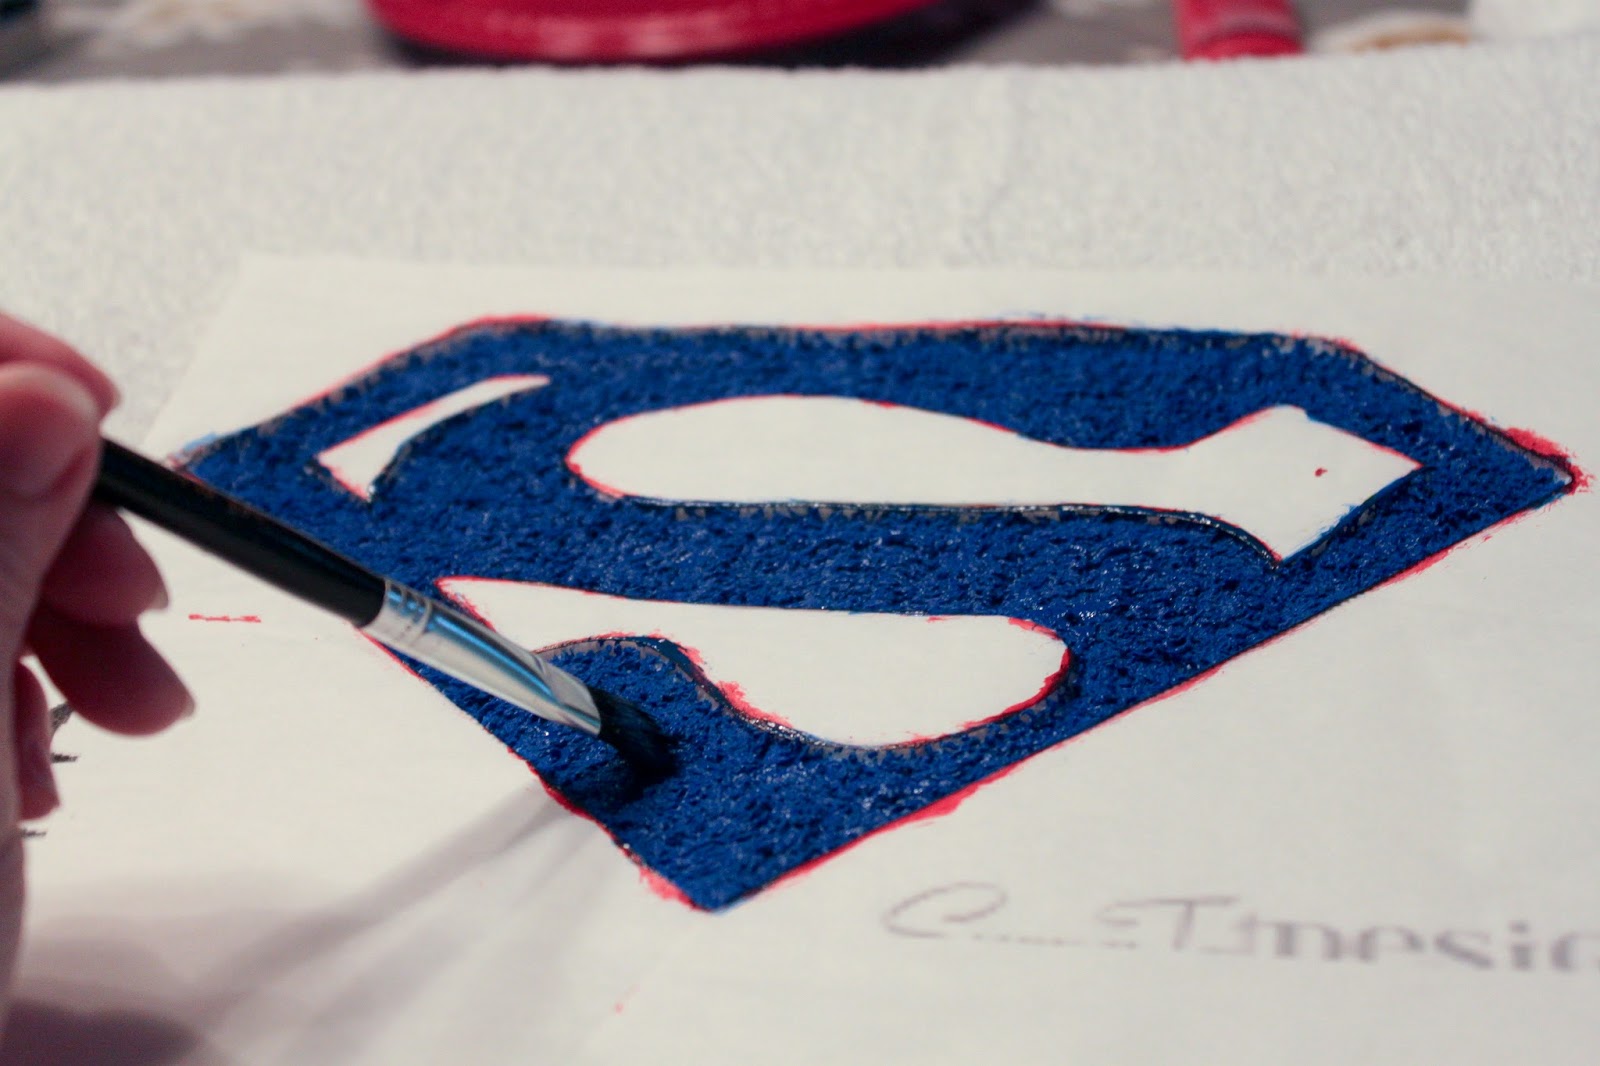
  3. Do a google images search for the logo or image you want on your towel.  I chose Batman, Superman, Wonder Woman, The Green Lantern and some generic lightning bolts and stars.  Copy and paste the image into a Word doc and print on the freezer paper following the instructions on the package.
  4. Cut the image (leaving the white space, removing the ink space).  This is very tough with the  Superman logo.
  5. Iron the template (glossy side down) onto the towel (5-10 seconds max).
  6. Paint the open spaces.  Be careful of the surfaces around you (the paint is permanent)
  7. Carefully remove the freezer paper and let dry according to the instructions. 
The templates can be reused but I'd alternate stencils giving each a chance to dry before you placed it on another clean towel to avoid a messy towel and a ruined iron.


I let the 3 boys use their towels before the party to see how everything held up and so far so good!  Seriously why don't all beach towels come with velcro strips to wrap?!


Friday, June 7, 2013

Friday odds and ends...

We have been experiencing a drenching rain for about 24 hours now.  Great for the lawn, not great for little boys' cabin fever.  Deciding that these are exactly the moments washing machines were invented for I decided that if we couldn't beat the rain we'd join it.


So we put on our boots and went puddle hunting. I won't remember the load of laundry in 20 years but we'll remember that fun afternoon :)


When we got back I found that a fairy godmother had left a very heavy package on our front porch.  It was heavier than a 2 year old with a soggy diaper after a puddle jumping.


It was the shell I've been eying for YEARS!  This thing has endless options as far as what to do with it.  For now I have it in the fireplace with some fake Ikea plants.  It really adds a nice summer lightness to the fireplace.  Love it fairy godmother!


Speaking of plants we've made some tweaks to the living room.  We added a plant to the corner.  I have a black thumb so here's hoping I don't kill it.  In fact as I was taking this picture I was wondering when the last time I watered it was.  Now that I'm typing that I'm thinking that same thought...and this is why my plants die.


Also to fill the empty wall space next to the TV we added a sunburst mirror from HomeGoods.  Placing a mirror on a wall opposite a window reflects natural light.  


Photobombed by Superman Brady.


Time to go water that plant :)

Tuesday, June 4, 2013

Dinosaur Birthday Party

We celebrated our baby's 2nd birthday last weekend.  He is very spunky 2 year old.  We call him Baby T-Rex so we thought a dinosaur themed birthday celebration with family would be fitting.

Using box cake, a can of frosting and a handful of toy dinosaurs I made dinosaur cupcakes.  Really inexpensive - couldn't have been much more than $5 for the batch and he loved them.


Using some of the items purchased from my Outdoor Love post we set up the party outdoors.  I hang lanterns from the pergola so little curious people can't get to the candles.


$24.99 basket filled with pool towels topped with a large platter, both from HomeGoods, doubles as an end table.


The birthday boy discovered he loves the pool this weekend.  That should certainly keep me on my toes.


A T-Rex piƱata for my Baby T-Rex.


This was as much of his cupcake as he actually ate...


...because a little while later he puked everywhere.  #stomachviruspartyfavorsforall!

Saturday, June 1, 2013

DIY Chalkboard Labels

Remember on my Outdoor Love post I mentioned that I wanted to DIY those chalkboard labels?  The ones from the post were only $25 but I thought I could do better than $25 for 4.  This weekend I got 'er done and it was really easy and inexpensive.

Start with any sized and any shaped piece of wood (seriously whatever floats your boat...heck use a boat shape).

Drill a hole.

Paint with chalk board paint.

Bam - DIY Chalkboard labels!

I made 50 of them for $10 (I already had the paint on hand).  Now what in the world am I going to do with 50 drink dispenser labels?  Par-tay - drink up!


Shared at: House of Hepworths, Between Naps On The Porch