Monday, June 11, 2012

iCan’t Stand the Wires!

Thanks to all the iPhones, iPads, work phones, etc. we are left with this tangled mess that I’m pretty sure just about everyone can relate to:

                                        20120611-IMG_3044    20120611-IMG_3041

The only thing I may have more of than wires is baby soap thanks to little boys who seem to get dirt in crevices I wasn’t even aware of:

 20120610-IMG_3030

I traced my phone on the empty soap container with a Sharpie.  Note to self: put the Sharpie away before a 3 ft tall creature attempts to write on your dining room wall with it.

20120610-IMG_3034

Cut the plastic doing your best to not lose a finger or thumb in the process.  Texting would be a total drag without a thumb.  Lay the cut out container on fabric to determine the size you’ll need.

20120610-IMG_3038

Sand the edges to smooth out any rough edges.  Coat the container with Modge Podge and wrap the container like a present (I put the seam in the back and the bottom).  Let dry 12 hours.

20120610-IMG_3039

Voila!  I spent a total of 20 minutes on it, used materials I had on hand and still have 8 fingers and 2 thumbs.  Can’t beat that!

20120611-IMG_3052

Monday, June 4, 2012

Cowboy Birthday Party!

We celebrated our baby’s 1st birthday party over the weekend.  I still can’t believe that was our last 1st birthday party…sniff, sniff…ok, moving on.

We welcomed our guests in cowboy style with a “Howdy” sign made of rope.

20120602-IMG_2803

To get in the cowboy spirit we asked everyone to ‘git their gear’ on their way in (bandanas and sheriff’s stars).

20120602-IMG_2798_2

                                           20120602-IMG_282320120602-IMG_2857

Even the 4 legged cowboys got into the swing of things.

                                   20120602-IMG_2778  20120602-IMG_2774

The kids panned for gold (play sand, pie tins with holes cut out and fake gold coins from the party store).  This cost less than $10 and my kids are STILL playing with it.

                20120602-IMG_2846

                    20120602-IMG_2861     20120602-IMG_2840

                                        20120602-IMG_2870     20120602-IMG_2879

We had a cowboy boot pinata

20120602-IMG_2865

                     20120602-IMG_295620120602-IMG_295020120602-IMG_2951

20120602-IMG_2968

The kids were given their own special meal of PB&J, apple sauce and “cow chow” served in a berry pint container and tied with twine and a tag that said “good grub.”

20120602-IMG_2810

I made a sign for the birthday boy’s high chair using paisley JPG’s found on google and some paisley ribbon.  We used a bandana for his bib.

20120602-IMG_2892

The cowboys and cowgirls were each sent home with a good bag full of cowboy themed goodies, tied with twine and the 1st letter of their names made out of twine. 

To make rope letters or signs mix 1/4 cup of Elmers glue, 1/8 cup cornstarch and a few tablespoons of water.  Dip the twine or rope in the mixture and form the letter, phrase or name on parchment paper and let dry for 24 hours.  I used this method to create the letters for the kids’ names and a ‘cowboy up’ sign for the beer.

Rope Letters

Last but not least a shot of the birthday boy himself with his birthday present (the few moments his brothers haven’t taken it from him).

20120530-IMG_2746

Sunday, May 20, 2012

Rolling Storage Crates

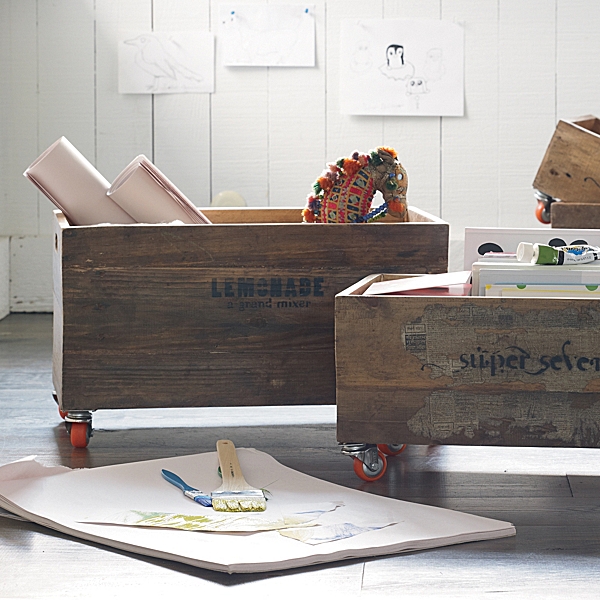
I recently discovered Serena and Lily.  Really cool, unique stuff.  One of the items that caught my eye was this rolling toy storage crate:

Remember how I said I was turning into my mom?  Well a few days after that crate caught my eye I went to visit my parents where my mom had already gathered all the supplies to build our own (with an upholstered lid upgrade).  Spooky.
Here is our version turned out:
20120512-IMG_2408text
Supplies:
  • Crates
  • Foam
  • Batting
  • Fabric
  • Casters
  • Staple Gun
  • Plywood
  • Poly (optional if you want to seal the sides, depending on the crate’s condition)
  • A really good sport dad willing to do a lot of the legwork for you
My parents saved these vintage crates from my great grandparent’s apple orchard so this part was free: 
                                                                                                   20120512-IMG_2337             20120512-IMG_2335
My dad did the boring work for us by attaching a piece of plywood to the bottom of each crate to stabilize as well as 4 casters onto each of our crates.  We were on a roll (pun intended).  I sanded the crates to knock off any splinters and then spray poly’ed the crates to smooth/seal the wood.  The best part of our crates were the vintage labels so in order to protect them I coated them with a few coats of Mod Podge.  Then our bases were ready.
                                                                                                      20120512-IMG_2339             20120512-IMG_2364
We upgraded our version of the rolling storage by adding an upholstered top.  Lowes precut all the plywood into the sizes we needed and covered in foam, batting, fabric and stapled.  No real science there, just make it look neat. 
20120512-IMG_2363 20120512-IMG_2368 20120512-IMG_2370
Easy peasy apple squeezy!
                                                                                                                              20120512-IMG_2403         20120512-IMG_2392

Monday, May 14, 2012

Bringing the deck out of hibernation

Before we bought the house we told our real estate agent that we wanted a place we could gut (and in the words of Randy Jackson) ‘make it our own dog.’  That is exactly what we got.  Someone was looking out for us by giving us a gut job with a great deck which meant that we’d have a refuge from the dust/mess/disaster zone inside.


The prior homeowners built a large deck with composite decking.  The fact that we don’t have to worry about splinters on our bare feet really makes it feel like another room.   The only maintenance we have is an annual power wash.  Another cool feature is a pergola.  The downside of said pergola is that it is painted wood which means it has to be repainted from time to time because it builds up with dirt, mold and smoke stains from the grill.  That time was May 2012.
                      20120506-IMG_2270                  20120506-IMG_2271
The key to exterior painting is to find a day when 1) It isn’t snowing 2) the leaves won’t be falling on wet paint 3) it isn’t too hot 4) it isn’t too cold 5) your kids don’t have t-ball/choir/preschool/birthday parties 6) it isn’t sunny and 7) it won’t rain for 2 consecutive days.  That basically left us with last weekend.

I prepped the wood by first power washing it.  Power washing something above your head means you’ll be soaked and have dirt coming back down into your eyes.  It is a really good time.  I let it dry overnight and then prepped the space by laying lots of plastic.  Using a roller and a brush we applied exterior semi-gloss exterior white paint to the wood.

Now I’m going to use a technical painting term to describe what the process was like.  It sucked.  Bad.  By around 6 PM when we were still at it my husband fed me hot dogs while I stood on scaffolding that is older than I am by a lot.  That is true romance in our house. 
But alas, it is done and hopefully means I won’t have to do it for a long time!

20120513-IMG_2514
20120510-IMG_2277

Monday, May 7, 2012

Word To Your Mutha

My mom loves 3 things: clichés, bacon and decorating. My husband jokes that the useful life of furnishings in her house is about 6 months before she’ll redecorate. Warning Sean: the apple doesn’t fall far from the tree. Damn I was hoping it was just constant redecorating gene she gave me but it looks like the “clichés” thing snuck in there too.  Short attention spans can get expensive so I like to fill the walls on the cheap. Thank you IKEA for inexpensive frames. Now to fill them…

I love photography so a few bucks for prints of my kids usually does the trick but right now I’m looking for some different. Enter Pinterest. People pin some hilarious, sometimes inspirational and sometimes weird quotes there.

Some favorites of mine are:

                  clip_image002 clip_image004 clip_image006 clip_image008

With a basic word processing program and about 15 minutes I figured I could do some typography art myself. You can either use the fonts available in your word processing program or go wild and crazy and download some free ones online (like dafont.com). If you decide to download a new font online: save the file to your computer. Open the zip file, drag and drop the .tff file to your desktop (or really to any location) and then drag it again to your font folder (c: windows: font). I don’t know why you have to drag the file to purgatory first but for some reason you do.

After doing one for my mom I…just…couldn’t…stop…so I did a few more for my house. Sean are you seeing the resemblance yet???

For my bacon / cliché loving / designer extraordinaire mom for mother’s day:

clip_image010

A set for the boys’ bathroom:

                      image          image
                      image           image

I love the lyrics to Queen’s, Crazy Little Thing Called Love. I had the lyrics running along the bottom of our wedding ceremony program so I thought it may be a nice reminder to put up on our wall.
clip_image012

…and one just because, in the words of Queen, I kinda like it:

image

Super easy.

Mom – don’t worry I won’t be offended if you want to swap it out in 6 months.  I’ll probably want to if you haven’t.

UPDATE: My mom wanted me to clarify that she loves more than 3 things...like me of course :)