More ORC posts this week. Check out the grasscloth post from earlier this week here.
The husband is now getting in the ORC spirit. Remember our hamper drawer from our IKEA Pax hack? Well the plan was always to cover it with a fake door front. We get a lot of requests for a 'how to' on building the doors so I'll use the build of this door to show the general concept. You would need to adjust the plans depending on your size/design needs. It takes a LOT of patience and precise measuring. I don't have either of those skills so this was a project for the engineer husband.
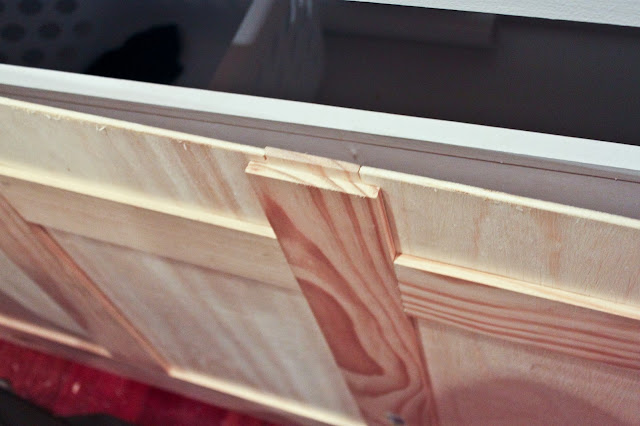
You could probably just use a flat sheet of wood and glue/nail the wood stiles right on top of it but if you're building a large door it would be prone to warping. Our doors are tongue and groove so that all the pieces fit together like a puzzle. This allows for expansion and contractions across the seasons which minimizes warping. Here was our plan:
We used 1x4" birch boards and 1/4" sheets of finished plywood to build our doors. The wood sat inside for a week or so to acclimate to the house. Using a 1/4" router bit Sean put the grooves in the wood. This is what the wood sheets will slide into.

That became this:
Once all the pieces were cut he dry fit it against the hamper drawer to see that it completely covered the drawer and while ensuring the doors on either side still opened. You can see how the pieces slide together here.
We used the very scientific approach of using a level and a Dinosaur Dig book to determine spacing off the floor to line up against the already installed doors.
There were many helping hands.
Before you glue, as you're assembling, stick a small square of window insulation at each corner of the plywood sheets. The insulation will give the wood freedom to expand and contract without the wood rattling around as it is moved. Next up, glue. Run a bead of wood glue on the rails and stiles only. Important - do NOT glue the plywood. That should remain floating to allow the wood to expand and contract with the seasons. Wipe up any glue drips quickly. Clamp tight and then let dry for 24 hours on a flat surface.
Next up - sanding, prime & paint! Lightly sand for smooth finish. 1 coat of primer and 2 coats of paint. We used Benjamin Moore Decorators White.
Head over to Calling It Home to see the progress of the other participants!


Those sure are cute helpers:) Glad you husband got on board cause it looks like he is pretty handy!
ReplyDeleteGod bless engineer husbands! Your entire crew is adorable.
ReplyDeleteThis is fantastic and I see he has LOTS of help! Thank God for handy husbands! good luck for the reveal!
ReplyDeletexo Nancy
Love the picture with all of your boys...what great helpers! Can't wait to see the finale!
ReplyDeleteLove the updates so far! My dad is super handy (he's a contractor) and I'm always getting his help on things. Your crew is adorable!
ReplyDeleteWe will need some doors like this as well - sounds like a job for my engineer husband as well! Your boys are precious.
ReplyDeleteYour room is really coming together. Love those little one's - so cute!
ReplyDeletePatty at Home and Lifestyle Design
Your boys are so cute and helpful!! Don't you just love it that when you look at an area in hour house you'll start thinking of this great memory of all of them working together?!!! Cant wait to see it all next week!!!!
ReplyDeleteSuper awesome! Your boys are so precious. Want to trade for my Tweens? Lol
ReplyDeleteBe careful what you wish for! Remember these little guys will grow up and then I'll have an 11 year old, a 12 year old and a 13 year old on my hands. How's that for spoooooky?
DeleteSuper cute little helpers there! What would we do without the trusty help from our understanding husbands! I told mine the other day, after he was complaining about all the projects I come up for him, that if he weren't so talented I wouldn't come up with so many great projects! LOL!
ReplyDeleteWow -- looks amazing ---- you are so lucky you have a husband who does this for you!!! Love you your little workers -- so cute.
ReplyDeleteSo glad hubs is getting into the ORC. I love that the boys helped, and good think you had that book.
ReplyDeleteGreat how to, and those are some adorable helpers you have there!
ReplyDeleteGreat progress - it helps to have handy men around - little ones included :)
ReplyDeleteoh my goodness...you have one handy husband! Mine can't screw in a light bulb (but he knows diy is his weakness so he steers clear, ha). I excited to see your final reveal! Love how you made a week 5 part 2....I just did the same with a week 5 1/2 post. Seems like there's still so much to do before the final reveal!!!!
ReplyDeleteThis is an amazing project--if only I could saw and measure straight! But I'm living vicariously through yours!
ReplyDeletexo Mary Jo
http://MagicalMined.blogspot.com
Where did you get those shelves in the center, above the hamper drawer?
ReplyDeleteWas it hard to move the hinges? I am considering the 90 inch closet cabinet with the smaller doors and leaving an open shelf at the top (with the soft close hinges), do you think that might be doable?
ReplyDelete